A company I work for had an hardware application which was pin-compatible and identified itself as a Arduino Pro Micro 3V3 / 8MHz. I wanted to get rid of the Arduino IDE and maintain a codebase which could be compiled and maintained with my old and trusted avr-gcc compiler using makefiles etc. I wanted to keep using the Caterina bootloader for downloading the hex files into flash memory.
This tutorial shows how to open and configure the serial port in the Windows commandline and the correct avrdude command (it doesn’t matter on which platform you do this except for the paths. In this tutorial i’m using MinGW to run avrdude from, but this also works in windows if you change the paths accordingly).
The way to do this is to connect your Arduino Pro Micro board to your computer with USB. Connect through USB with the bootloader using a 1200bps connection. If all goes well a new serial port will open up which will be used to upload the hex file.
- Start PowerShell (WIN+R,powershell [enter]). At this point a “PS C:\Users\yourusername>” prompt should be shown.
- To see a list of available serial ports type the following:
[System.IO.Ports.Serialport]::GetPortNames() - You should see a list of ports having names like COMx. In my case it shows me COM3 which is the serial over USB connection from the Arduino in my case. If the correct port is not in the list reset your board or reattach the USB cable to your computer.
- Create a object which represents this port with all its parameters so we can open the port with a simple command afterwards. Type the following:
$port=new-Object System.IO.Ports.SerialPort COMx,1200,None,8,one - Open the port by typing:
$port.Open()
followed by (just press up arrow to cycle through the command history)
[System.IO.Ports.Serialport]::GetPortNames()
to see what happened. It looks like this:
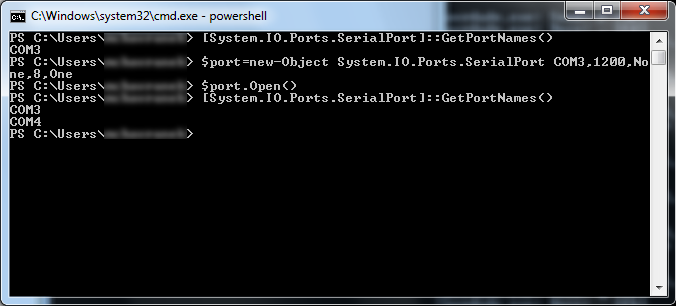
- A new port should appear in the list. If the ports disappear try step 4 again.
- From a different window (second command shell or MinGW shell) issue this avrdude command (i’ll show the MinGW line I use):
/c/Program\ Files\ \(x86\)/Arduino/hardware/tools/avr/bin/avrdude -C/c/Program\ Files\ \(x86\)/Arduino/hardware/tools/avr/etc/avrdude.conf -vvvv -patmega32u4 -cavr109 -P/dev/ttyS4 -b57600 -D -V -Uflash:w:pathtohexfile.hex:i
the part that says -P/dev/ttyS4 should be the port that appears in step 6. in my case COM4. if it’s COM5 this part should read -P/dev/ttyS5. It’s important to issue the avrdude command within 8 seconds of issueing the $port.Open() command. If you miss this window, reset the board and try opening the port again.
A lot of data will fill the screen and the upload is complete! If you have questions feel free to ask and i’ll try my best to help.
Cheers,
Richard